Alter ego project
After creation of my character for the previous task, where we were asked to create a character with specific abilities and background, we have been asked to create an alter ego character. I must be an opposite side of the existing character which will have a new feature and needs to be animated and have one of the animation principles. In this blog, I will describe the entire process of the character creation following a simple pipeline – from the research to the rendered animation. I hope this blog is going to be informative and fun at the same time.
Research
Before I can start the concept art, I need to have some references which are going to help with needed information about shapes and designs of my character. I already know, that my character must be a doll as my previous character was representing a Voodoo doll with opposite features, he was all about good actions and fun. Therefore, my new character will represent a Voodoo doll with its original features. I will look up for unique design solutions of the doll and accessories which come along with it. I will also look up for the cultural aspect of these dolls and what kind of benefits they are providing to their owners.
Influence
Influence
This animation movie made me think about my character's look. Huge mask on the face which covers all emotions has this tribal touch. I like the prevalence of the red colour on the mask which shows that this in definitely not a good guy anymore. Also, I would like to stick with the wooden material for the mask, and I can observe how it might look in terms of shape and "weight".
A doll shape and form

This doll has a human-like anatomy which is going to be used in my character as well. I would like to create my character with the ability to walk and basically – act as a human. The construction of this doll has a nice texture and interesting shape of the body. I like the feathers which are coming out of his hoodie. I could borrow this detail and use in my own design.

The iconic look of the voodoo doll. Buttons, nails (usually we can observe needles instead) and stitches along the body, representing fabric pieces which have been sewn together. I will use stitches in my model for sure as my model will have a fabric material as I want to make it organic. Looking at this design leads to a thought that I will use a mask which is going to cover the face. It will be a nice detail and will have a purpose. My character will have no emotions as he is not going to be interested in anything and suspended so the mask will have a still, neutral emotion. Perhaps I will use nails as well as the stitches. Needles could be too thin and barely noticeable in the animation.
 |
Perfect reference to use. Stitches are well defined and the texture of the fabric has a nice detail with spots of dirt. It shows that the fabric has been well-worn and rough. The color scheme of this image looks like something I have imagined when I was thinking about my character. This doll has no face at all, only stitches are representing the eyes which are looking interesting, Although, I can feel a lack of character. It is understandable, as this doll is going to be used for the Voodoo rituals, but my character is going to be used for the animation. Therefore, I need to have more detail compared to this reference.
 |
This is the closest representation of my previous character. These dolls in the image have no legs and arms in the usual sense. But they have masks, which are not representing any emotion. I could use this detail for my design. I also like the outlook of these dolls. Hay sticking out from sleeves, pendants on the neck creates a character. I am thinking to add pendants to my character as well, this is why I am using this reference image here.


I have already decided what kind of material my character is going to be made off so I have taken this reference to see, what kind of colour I could use for my texture when it will reach a texturing phase.
So far, I can see that Stitches, buttons, and needles are the main detail package. I think that I might get rid of buttons and needles as I don’t want to overload my character with detail, but it will be clear when it will come to a modeling
Masks which are covering emotions...
During the research covering the biggest part of my character – the body, Ideas came one by one. I have decided to use a mask instead of face emotions, it will also make the work easier to me, as I am not going to animate facial emotions, but it is not my main priority anyways. Now, I am looking for different masks to find out what kind of material I would like to use to my own one and how is it going to look like. I must have a strong character and pleasant look as this detail is going to take most of the attention.

This mask looks too aggressive to me, although, I like the detail which is painted over such as the moon, red dots and circle with a cross in the middle. Lines arising from slots are representing the blood coming out of the eyes. I exclude this in my own design as my character is not going to have a creepiness aspect even if he is a Voodoo doll. The shape of the mask has a nice, defined forms. If I will use feathers for the mask, I will probably have to use Alpha channels, Although we have to create a low-poly character so I might have the mask with no additional moving detail.

This mask has been created for the softball game. I like bones covering the upper part of the mask. It is a nice detail and it gives a strong character, nonetheless, this mask has an emotion on it. Bones representing teeth looks amazing and I will use nostrils on my mask as well.

This art work clearly represents a wooden made mask. I want to have a wooden detail in my mask as well. I think that this is the most common material for mask creation in Africa as it is a very easily accessible and easy to operate with. I am not going to use any design solution from this image, I added it here only because it gave me an understanding of the material I will use to create my mask.

Doesn’t look like a mask, right? But what I have noticed is the location of the make-up, how the white colour works here and how the black spots compliment the overall look of this image. I feel that it could work on in my project, although, I am afraid that white colour in such an amount is not going to work well with a light color of the body as I have mentioned earlier in the “Body” research section. I am looking for a contract in my character, so the colour of the mask needs to have an extreme contrast with the body.

Another white coloured mask. This time I am looking at the shape of the mask, so this reference shows a nice, minimalistic design which is going to work well combined with a low-poly model. I don’t like the eyes and nose design in this image, I will make eyes look bigger and two nostrils instead of one.

This mask has a nice detail underneath. I was looking for an inspiration to create nostrils for my mask and this image has a nice aspect in it – asymmetry. The mask looks like a rough, handmade, wooden object which is exactly what I need. I like the cracks which stand out through the paint. It is a nice detail which I must use in my own design.

This reference has so much detail in it. Pendants, colour schemes, facial details. Basically, it has everything I need. Personally, I think that red colour works perfectly here. The colour of the body of my character is going to have a similar shade, so the red mask is going to look good. I will also use a white colour on the mask texture to add more detail. Pendants look simple but effective, I will represent this in my own 3d model.
Skirt as a fashion...

A leather made a skirt with slices of the leather overlapping each other. The design looks fantastic.
I am not going to be able to simulate such a detailed cloth, but the texture of it can be complimented with a Bump map, which is going to create a depth. I like the lengths of this skirt as I need to consider the length of legs of my character.

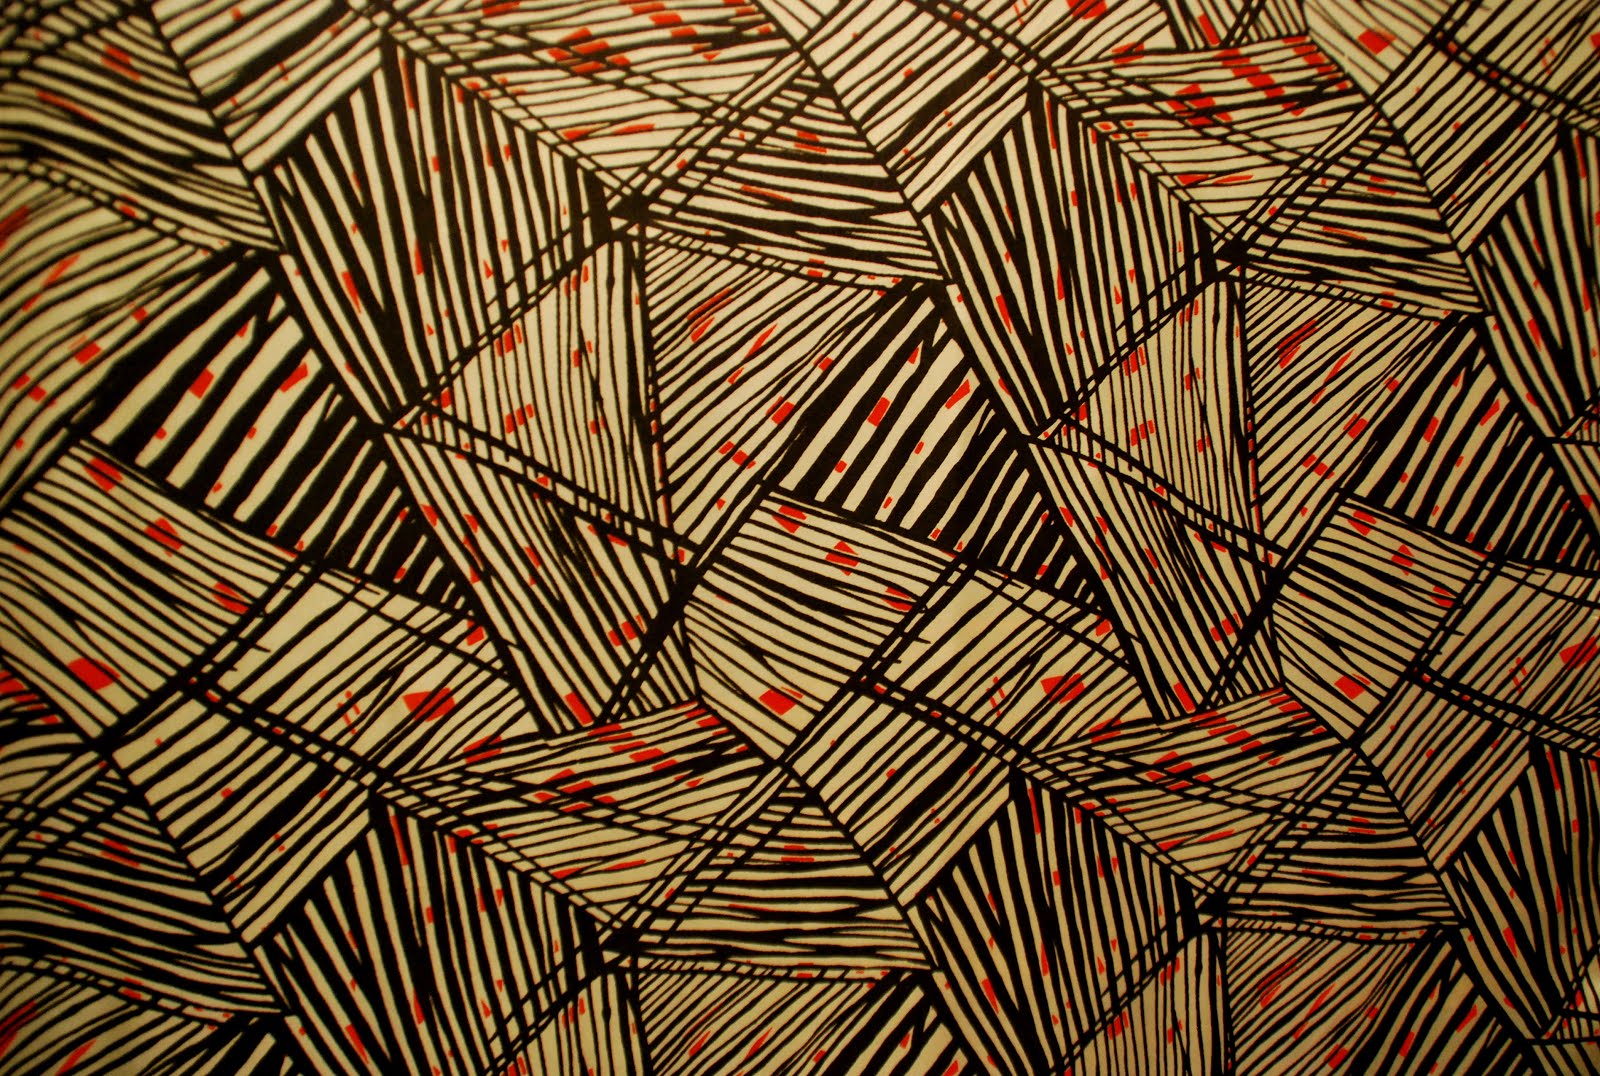
A very nice texture of the skirt. Apparently, I have found the reference I need. It has a nice “zebra” look textile, it is simple, no aggression, and looks pleasant. The only thing I would like to add to have a readymade reference for the model is something, which would work as a shield in the front. Some wooden detail would work well. I will figure it out when I will start to draw a concept art.
You might ask, why do I have such a small amount of references? Why I don't have a bunch of photos scattered around? I will explain. I think that the reference needs to contain a useful information. Each single reference showed here gives me a needed detail, idea and understanding how it might work on my own model. I could post tons of images related to this theme and you would not even notice - have I used them or just posted for you to see how good image uploader I am. It is very hard to find a good reference which is going to show you enough information, Therefore each of these references was carefully selected to leave an influence on my character and you are going to be able to notice that really quick.
Concept art
My concept art might differ from the ideas I have mentioned in the “research section”. It always happens, some innovative ideas are visiting the head or your imagination flies somewhere else instead of the planned route. I found it hard to design something new, especially if your drawing skills are less impressive than your imagination.

I have started with a design of the mask. I have tried to keep it emotionless and relatively simple. I thought that the teeth underneath the mask would bring an interesting detail and I have also tried assorted colour schemes. The main material here was the actual human bone, I as thought it would be quite relative to the actual idea of the Voodoo doll. The shape on the top of the mask needs to be changed to something like the reference I have mentioned earlier.

An uncomplicated design of the body accompanied with the mask I have designed earlier. I wanted to see how the mask sits on the head of the character. We also can observe that the character is floating in the air. This was made with a purpose – to see how the character would look if it's floating instead of walking. To be honest, at this point I was thinking about the animation and how hard it is to animate a walking cycle, so I thought, what if I will get rid of the legs and make him float to simplify the work. It is not a professional approach, I know, I need to set the challenge for myself to proceed. Therefore, this was just an experiment, nothing more.

Some more early stage designs I have drawn. I have experimented with a body shape and mask designs here. I was thinking if I would add a shoulder plate which looks like a mask, and I found it ugly.
Right side bottom one looks decent enough to call it a concept, I have added a pair of horns sticking out of his head and some randomly placed teeth underneath the head. I have also experimented with stitches placed around the body. I can’t say that I like these drawings as they look way too unprofessional. At least they have some detail which I could use during the modeling phase later on.


The final concept art. I have coloured the character and have also added another one to see how different can I go with the detail. The colour scheme may change during the texturing, and I have forgotten to paint the mask in red. I like both characters, but I can use only one, that one who looks more like a voodoo doll. At this moment, it looks like and alien to be honest, and the reason of this is because of the colour. I might admit that the colour scheme could look different, but at this stage it is just a concept art – something which guides me and doesn’t restrict as I am working for myself.
The next section will be my favourite one as it is going to be all about the modelling. I will give an attempt to describe what kind of techniques I have used to model accessories and why It looks so low-poly. I hope it is going to useful and interesting.
P.S.
The character, which is going to be shown in the next section, is the final representation of all my attempts and therefore he looks so different compare to the concept art. I don’t want to mess up such a nice blog pipeline, so my defeats and fails are going to be shown in the end of the pipeline in the “Fails” section. This doesn’t mean that I am not going to write about fails during the modelling and texturing of the current character, so don’t worry.
Modelling
This is one of my favorite pipeline’s part. I truly enjoy modeling and everything relevant to it, so I hope to describe the process of the model making as good as I can. I must confess, that I have lost some screenshots of my working process so I will try to fill the missing part verbally.

This is the result of the modeling. We can see the character with no accessories attached and fully equipped one. I made these two screenshots to explain how this character is going to be animated. The body itself will represent an organic structure while the mask, skirt, and pendants are going to be hard surface models, therefore, they are not going to bend during the animation. I know, it sounds strange, you would say that the skirt needs to bend. The purpose of this decision is hidden in my previous attempts to create a nice relation between legs and skirt. Lack of skill has changed the idea so the skirt will stay solid. It is not going to affect the animation as the distance of the step is the same as the diameter of the skirt. The body looks cartoonish, with a small body, thin limbs, and a huge head. Everything looks like I was imagining. The shape of the mask was also changed comparing to the concept art. The skirt has its own mask in the front for a more distinct detail.
Unfortunately, this is the visual part I am missing. I will describe the process verbally now. To be clear about the software which I have used for the modeling it is called Cinema 4D. I am using this software only because I have used it before and I feel familiar with its layout.


I have used box modeling technique, which involves a primitive – cube. By using the extrude tool, knife tool, bevels and loop cuts I have formed the shape of the body of the character relying on references which I have mentioned before. Adding cut but cut I formed the final shape of the character. I tried to stay low poly as much as possible as it is one of the key features of this character. The ability to have a decent amount of detail within a small number of polygons is a true art which I want to master. You can’t do the modeling with without knowledge of the body anatomy. I know it a little bit so it wasn’t too difficult to create the body shape.

To create the skirt, I have detached the loop of the polygons from the body shape. After that, I extruded the polygons to give a volume of the shape. By using the extrude tool I have extruded the bottom polygons to represent the length of the skirt. While playing around with vertices and polygons I have added the mask to the skirt. I did the same steps with the mask and pendants. The shape of the mask was created relying on the reference images.

A Full gear of the character. I am not worried about cracks, bumps etc. at this stage as textures which I will create will represent the additional detail.
It wasn’t difficult to model such a low poly character although, I have been modeling hard surface models mostly. If this would be an organic model, I would probably suffer. The only difficulty I faced during this character model is to keep as round head as possible within a restricted number of polygons. The overall number is -1206 polygons, which is a respectable number for a medium poly model. The reason for such a “high” number of polys is a separate detail such as mask, pendants, and skirt and they hidden sides. If I would do a retopology I could end up with 800 quads. I could even get rid of depressions in eye sockets and make eyes textured. Same with the nostrils.
The model can look good already, but we need some textures to make it even better. The texturing process is a very responsible operation as they are going to define the final look of the character. I have got references so we approximately know how the character is going to look.
Texturing
I know the Cinema4D quite well, except its UV mapping tool. Therefore, I am going to jump to another software called 3Dsmax. I don’t know this software so good, but I know it’s powerful UV mapping tool. Why am I talking about the UV’s if there is an option to use materials within the software? That is a good question, and I have a decent answer. If I will use materials created in the software I am not going to be able to represent the look which I want to. I want an image on a specific spot. For these purposes, I am going to use a UV mapping technique, where I can see where exactly the texture will take a place, I will also be able to see how it looks on the model, and if I don’t like it, I can use photoshop to edit it.

To import my model into Max I need to export it first as an OBJ file. Luckily, Cinema 4D has a ready preset setting for the 3dsmax. This will allow me to play around with my model in another software with no issues.

I have decided to start with accessories first. Their shapes aren’t too complex compared to the body. It is always easier to work with a flat surface in the UV unwrapping tool as you just need to select the faces and they are going to look the same in the UV editor. I have selected only a face of the mask as the back of it is not going to be seen anyway. For the skirt, I went a little bit more complex. I have selected both sides of it in case if the underneath of the skirt will expose during the animation. For the pendant, I have decided to use a material within the software as it is quite tiny and barely noticeable detail.


UV maps for the face mask and the skirt.

The body UV unwrapping process. Looks much more complex that the mask or the skirt. To perform a correct UV map, I needed to make seams in correct places imagining a shirt ripped along seams. The body has its back and front, same with the head as I can’t unwrap a sphere – it needs to be cut at least by a half. The same technique has been used for arms and legs. This model is perfect for practicing such a thing as it is low poly and hasn’t got any complex shapes such as fingers. Basically, it is built from cylinders and sphere and the rest is up to you, how to cut it to end up with a nice UV map.

The body UV map. It would be difficult to another person to paint it as I am the only one who knows what is what and where it belongs. When you are creating a UV map you need to arrange parts of the model logically to not forget where each part of the UV map belongs to. Of course, some models can be complex and the only way to paint it perfectly you will need to switch between Photoshop and your 3D software constantly to see the changes on the model after you have made changes on the UV map.
After the UV maps have been created, I jumped into the Photoshop to start painting. I have already searched for textures which I want to use relying on my ideas in the “Research” phase.

I want to use this texture as the main material of the mask. It has defined cracks and depressions which are going to look good on the model.

This is not a Voodoo theme painting. This is the Tiki ornament from Maori mythology. The ornament itself is not going to be noticeable so much. I have used this texture to give the mask white lines across the face.

A red paint serving as a contrast piece. Every single texture has been overlayed so the end result looks like this:

To have a more distinct depression on the mask I have created a bump map. To create this map, you just need to desaturate existing texture and play around with Levels to create a contrast between whites and blacks. Whites resembles areas which are not going to be affected, blacks – are going to be affected in the 3d software.

A bump map. It is not perfect as I don’t want the right black spot to be so dark, but it is fine for this model. I will do the same with the rest of detail.

This is how the texture looks in the 3Dsmax. I will fully texture the model in this software to export it as an OBJ file for the next phase – animation.
 |
The final render of the mask. Looks good, isn’t it?
|
A Texture for the skirt. It has a nice African vibe and those reds spots are going to work well with the reddish mask.

A bit of fabric to compliment the skirt texture.

I found this amazing zebra mask which is going to serve me as a texture for the skirt shield.
The texturing process for the skirt was easy as it doesn’t have a complex shape. I have also used a bump map for the skirt.

Fully textured UV map for the skirt. Every single texture overlays each other.

Textured and rendered. This is how the texture sits on the model. I am more than happy about its look.

The main texture of the character. I have used my references in the “Research” phase to find a suitable texture for the body. Now it looks too fresh so we need to mix it with some well-worn fabric.

This one will do. I will use overlay mode to mix them together.

The process of the painting. It wasn’t so difficult as I have expected. You can see black lines around the texture, they are going to represent stitches. It is super hard to calculate where another half of the stitch needs to be painted so they all are random. I hope it is still going to look good on the model.


Diffuse and Bump map

The process of the bump map creation. Here we can see the difference – no bump map on the left side. Also, stitches look good enough.

The model has been already imported in the Cinema4D for the animation phase. This is how the model looks with the texture on it.

Fully textured and rendered the model. I am happy about the result. I think that the model looks charismatic and not overload with the detail. I could make stitches to the tool more defined, but at this stage, I can see, that they won’t be noticeable at the animation stage anyways as I will show the full body movement.
This was my first texturing experience, I may look easy, but in the reality, you need to have a good eye for a detail as the texture creates the overall mood and look of the character.
Alter ego profile
If the previous character was joyful, always ready to help and make people happy, this guy is the opposite. It doesn't mean that he is a pure Evil, no, it means that he isn't really interested in anything. By another word, he is a visualization of the apathy. Sometimes even super happy people have this time when they feel like nothing is giving any taste of life and therefore they don't want to do anything. As this character is the alter ego, the only difference between him and GooDoo is the energy he brings to the world. Oh, yeah, his name is VooDoo by the way. He is able to suppress your happy mood, he is able to make you feel apathy and he is alive when no one is watching him. Nothing entertains him, he doesn't like anything and he doesn't know what is the Initiative. Both characters, GooDoo and Voodoo can give a real taste of life with no mixture of unrealistic "Only happy mood" life.
Animation
The most interesting part of the project, in my opinion, is the animation process. I am a newbie in this field. I haven’t done any animation for the character before and this task is going to be a challenge to me. I am planning to set up a scene, like a small world where my character would take a walk. I need to expose one of the animation principles so I will try to create a walking cycle with a secondary animation where the detail of the character such as mask, skirt etc. is going to have a movement during the walk.

I have tried different biped setups – ready to animate pre-set, downloaded biped and custom bones for the character. During this phase, I decided to create my own biped where I am going to be able to understand the entire process of the skeleton creation. I could use a readymade biped, but I think it is a sort of cheating. I need to go through every step of this task to understand the fundamentals of this field.
I have created skeleton using bones, arranging a right hierarchy I was able to move certain parts of the skeleton the way I want to. There was an option to create IK-chains for a better control, but I have decided to use a rotation tool within the skeleton. So, I was able to rotate a shoulder and the whole arm followed this motion.

Here we can see the process of the animation, I have used only the rotation tool to move bones around. The character is already bound to the skeleton so every movement I create is represented in my 3d model.
For the walking cycle, I have used only 24 fps, so the keyframes at the 1st frame is the same as the keyframes at the 24th one. For a reference, I have used a walking cycle guide.

I have used this reference image as a guidance. This reference resembles 12 frames, and as I have made a 24frames long cycle, I have just copied keyframes. To make the animation longer I have copied keyframes till I reached 7-second-long animation.

After the walking cycle was successfully created I added the spline track for the character so he can follow it and make the movement more interesting. A plane with a deformer on it serves as a ground.


These are textures which I have used for the ground visualization. Dirt track represents the path where the character is going to walk. For this texture, I have used the same technique I have used previously for the character.


I have also created a low poly tree to make the location richer. The whole scene represents African desert.


Textures which I have used for the tree. I wanted to create a low poly tree with a nice stylized texture as the scene needs to look pleasant and realistic textures would stand out too much

Rendered frame with a fully textured scene. I have used a physical sun object with a sky preset. I have set the time for a late evening to achieve this warm summery look at the evening. Basically, I haven't used any specific shadow settings as the Physical Sky has them on already. I have added AO and GI to create more depth into the scene. It took me around 30 minutes to render this 7 second long animation.

This how the Dope sheet looks like. After a while, it gets very hard to control the specific keyframe within this sheet. I have also added a glowing bug passing by the character to add more life into the scene. I have used GI and AO for better shadows and lighting. For a test renders, I have used 600x400 resolution to render the animation quicker. In overall I am quite happy about this art piece. The only issue is that the character movement looks stiff at the Contact phase, but I feel that this gives a charisma to the character as he is a doll after all.
Animation Principle
My character looks like he is made out of a solid material, I have tried to rotate his belly and chest during the walk to make the movement look more natural. I thought, that his legs are a bit too stiff, but from another side, this specific feature adds some sort of charisma to the character. Understanding, that I am not able to do stretching and that sort of things in the 3d animation yet, I used the basic animation principle - Secondary movement. You can see how the mask is displaced during each new step of the character and how the necklace jumps up at the PASS position. His skirt is also jumping up and down to add a comic look to his purposeful style of the walk.
Fails
As I have promised it is a right time to show my fails in the very first attempts to create this character.


I am not proud of my work here, to begin with. As you can see this model almost perfectly represents the concept art. I must admit that I have imagined this character a bit differently while drawing it. Of course, it is not so bad and this character still can be textured, but I already defined the main issue - the body proportions. To make a character look believable we need to keep a basic proportion right to give a right feeling to the brain that this character could be interpreted as an humanoid.

Another version of the character. This time the character turned out having a feminine body. This is a sequence coming from the reference image I have used to create this character


If my character would represent a girl I would definitely use this model. You can also notice that the sticks behind the back are bent a lot. This is because I had problems with weight painting As I haven't used this technique before. Also, the chest mask would restrict the movement of the character in terms of bending forwards or backward.
Conclusion
The Very inspiring task I must say. I had a feeling that I am doing something more professionally than ever before. Following the right pipeline, starting from the research and ending with the render. Doing every stage step by step I felt self-collected. Normally, when I am modeling or creating something for myself I am chaotic in my steps, stages, and production, I can easily jump from one stage to another one or change everything and start from the beginning. At this time I was planning everything from the very beginning of this blog. During research, I was imagining how these colours and shapes will look on the particular shape of the body etc. The hardest part was a documentation of all of this process, gathering screenshots, explaining every step is tiring, but at the same time, it is a good practice to strengthen the memory and skills. I am proud of myself being able to create something from the scratch with a more or less decent end result. I know, this isn't an industry standard at all, I see where I need to improve and where I need to learn. I could make the movement of the character more interesting If I would be more patient with those hundred keyframes, or If I would understand the logic behind them a bit better. I could make a scene look richer and filled with specific ambiance if I would know how to create mist effect etc. I don't dare to say - I am good at what I am doing, but I know what to do to be able to say this later. This was an amazing experience in terms of organization my workflow and picking up new skills in terms of animation.
Video